Jello Poke Cake Recipe
If you grew up in the 70s, 80s, or 90s, chances are you have a fond memory of a cool, colorful dessert sitting on a picnic table at a summer barbecue. It’s the kind of treat that screams “nostalgia.” I am talking, of course, about the classic jello poke cake recipe.
But this isn’t just a dessert for the history books. This retro classic has made a massive comeback, and for good reason. It is arguably one of the moistest, most flavorful, and visually stunning cakes you can make with minimal effort. Whether you are looking for a patriotic 4th of July treat, a refreshing summer snack, or just a way to spice up a standard box mix, this guide is for you.
In this comprehensive post, I’m going to share not just the instructions, but the science and secrets behind the ultimate jello poke cake recipe. We will cover everything from the perfect hole size (yes, it matters!) to flavor combinations that will blow your mind. Let’s get baking!
What is a jello poke cake?
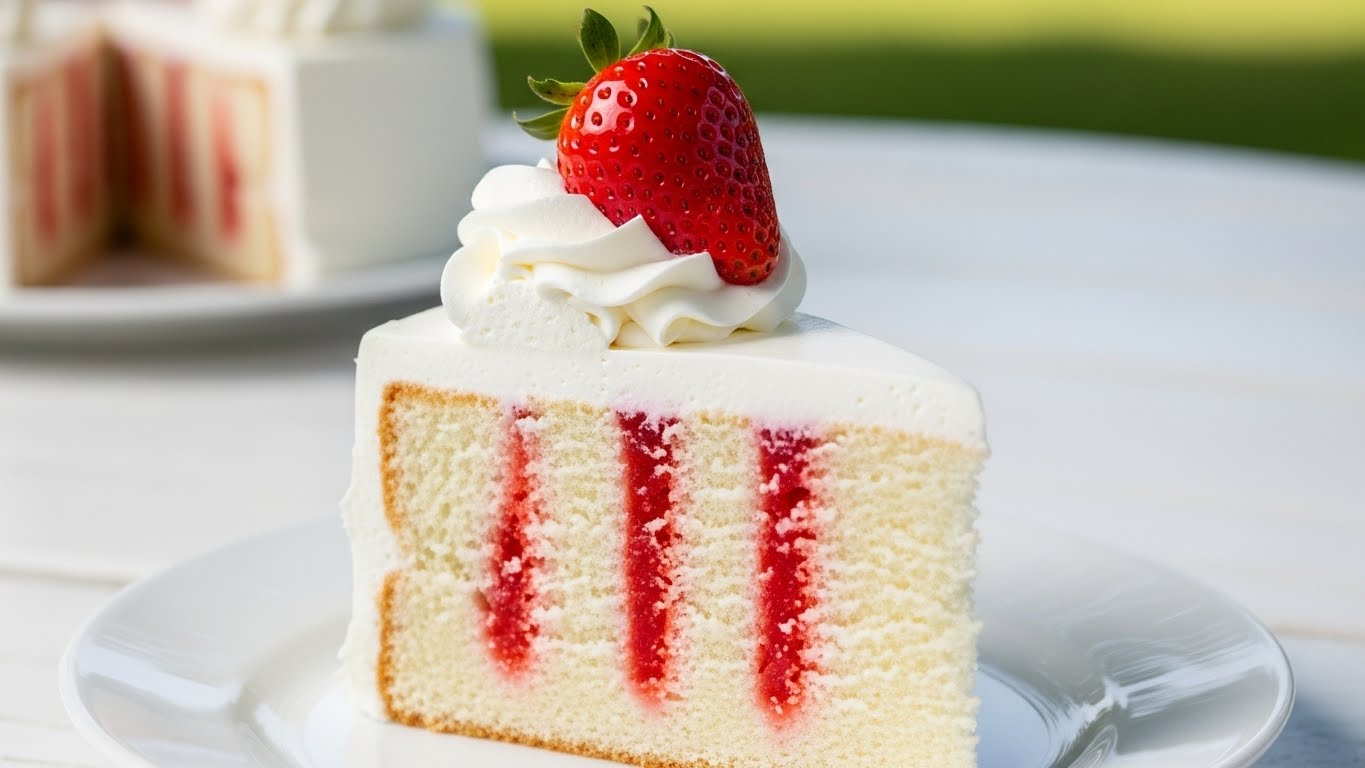
At its core, a jello poke cake recipe is a stroke of genius in its simplicity. It consists of a baked white or yellow cake that, while still warm, is poked with holes all over the surface. Liquid gelatin (Jello) is then poured over the cake, seeping into these holes and saturating the crumb.
As the cake chills in the refrigerator, the gelatin sets. The result is a dessert that is transformed from a simple sponge into a colorful, striped masterpiece. The texture changes, too—becoming incredibly moist, almost refreshing, and cool to the palate. It is traditionally topped with a whipped topping like Cool Whip to balance the sweetness of the gelatin.
Why is it called a “poke cake”? Quite literally because you poke holes in it! It was popularized by the General Foods Corporation (the owners of Jell-O) in a 1969 print advertisement to boost sales, and it has been a staple in American kitchens ever since.
Why You Need This Dessert in Your Repertoire
Before we gather our supplies, let’s talk about why this jello poke cake recipe deserves a spot in your recipe binder.
- Impossible to Mess Up: If you can bake a box cake and boil water, you can make this. It is beginner-friendly.
- Make-Ahead Magic: This cake actually tastes better the longer it sits. It’s perfect for making the day before a party.
- Endless Versatility: By simply changing the Jello flavor, you change the entire theme of the dessert.
- Crowd Pleaser: Kids love the colors; adults love the cool, creamy texture.
Ingredients you need for the base and jello
To execute the perfect jello poke cake recipe, you don’t need fancy, expensive ingredients. In fact, this recipe celebrates the beauty of pantry staples.
Here is your shopping list:
The Cake Base
- White or Yellow Cake Mix: You will need one standard box (15.25 oz). Brands like Betty Crocker, Duncan Hines, or Pillsbury work perfectly.
- Ingredients for the Cake Mix: Usually water, vegetable oil, and egg whites (for white cake) or whole eggs (for yellow cake).
- Pro Tip: For a sturdier cake that holds the Jello better, replace the water in the box instructions with milk.
The Jello Infusion
- Gelatin Powder: One small box (3 oz) of your favorite Jello flavor. Strawberry, Raspberry, Lime, and Orange are the most popular choices.
- Boiling Water: 1 cup.
- Cold Water: 1/2 cup. (Note: We use less cold water than the package instructions to ensure the flavor is concentrated and the texture is right for the cake).
The Topping
- Whipped Topping: One tub (8 oz) of Cool Whip, thawed.
- Alternative: You can use homemade stabilized whipped cream if you prefer to avoid processed toppings.
- Garnishes: Fresh fruit (matching your Jello flavor) or colorful sprinkles.
Equipment Checklist
You probably have these in your kitchen already, but double-check:
- 9×13 inch Baking Pan: This is the standard size for this recipe.
- Hand Mixer or Stand Mixer: To beat the cake batter.
- Round-Handled Wooden Spoon or Large Fork: This is the “poking” tool.
- Liquid Measuring Cup: For the boiling water.
Step-by-step guide to poking and pouring
Now, let’s get to the action. Follow this method closely to ensure your jello poke cake recipe turns out moist, not mushy.
Phase 1: Bake the Cake
- Preheat & Prep: Preheat your oven to 350°F (175°C). Grease your 9×13 baking pan with non-stick spray or butter.
- Mix & Bake: Prepare the cake mix according to the package directions (or your homemade recipe). Pour the batter into the pan and bake as directed.
- The Toothpick Test: Ensure a toothpick inserted in the center comes out clean. Do not overbake, or the cake will be dry (though the Jello helps fix that!).
- Cool Slightly: Remove the cake from the oven and let it sit for about 15–20 minutes. You want it warm, but not scorching hot.
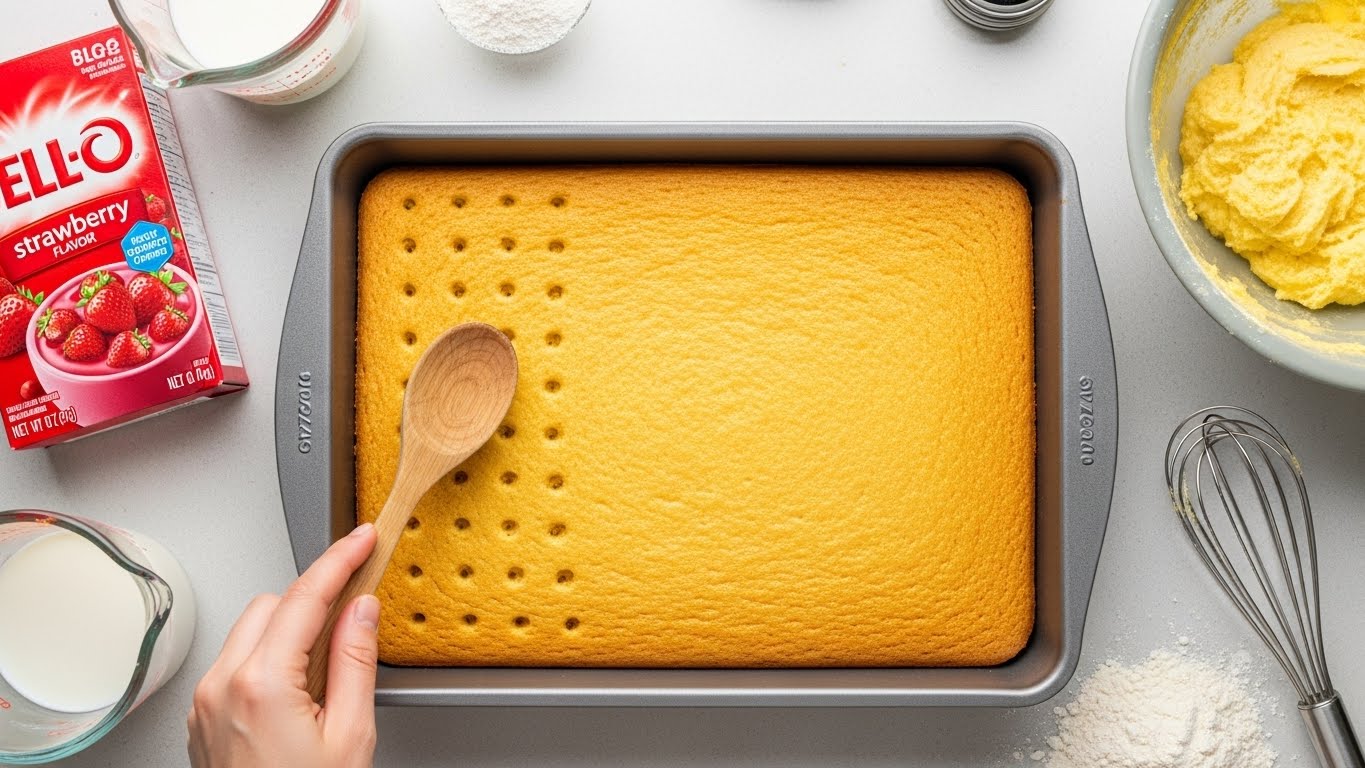
Phase 2: The Poking Technique
This is the most crucial part of the jello poke cake recipe.
- Choose Your Weapon: Take the handle of a wooden spoon. If you use a fork, the holes are too small and the Jello won’t seep down creating those beautiful stripes. A wooden spoon handle creates the perfect “tunnel.”
- Poke Away: Poke holes all over the cake. Aim for rows spaced about 1 inch apart. Don’t be shy—push about halfway to three-quarters down into the cake.
- Warning: Try not to poke all the way to the bottom crust, or the Jello might pool at the bottom of the pan and make it soggy.
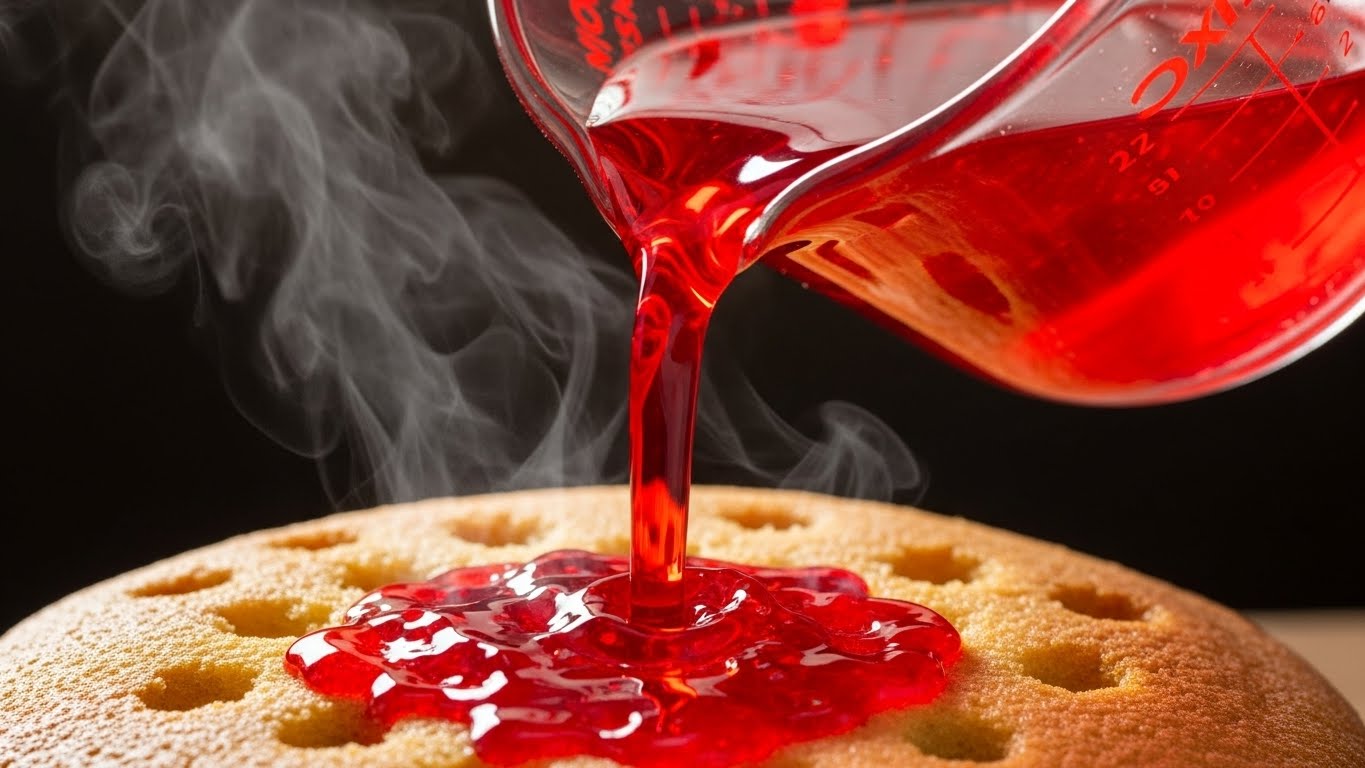
Phase 3: The Jello Infusion
- Mix the Jello: In a medium bowl, stir the Jello powder and boiling water together for at least 2 minutes until fully dissolved. Stir in the cold water.
- The Pour: Carefully pour the liquid Jello over the cake. Focus on filling the holes first, then distribute the rest evenly over the surface.
- Tip: Use a spoon or a measuring cup with a spout to have better control than dumping the whole bowl at once.
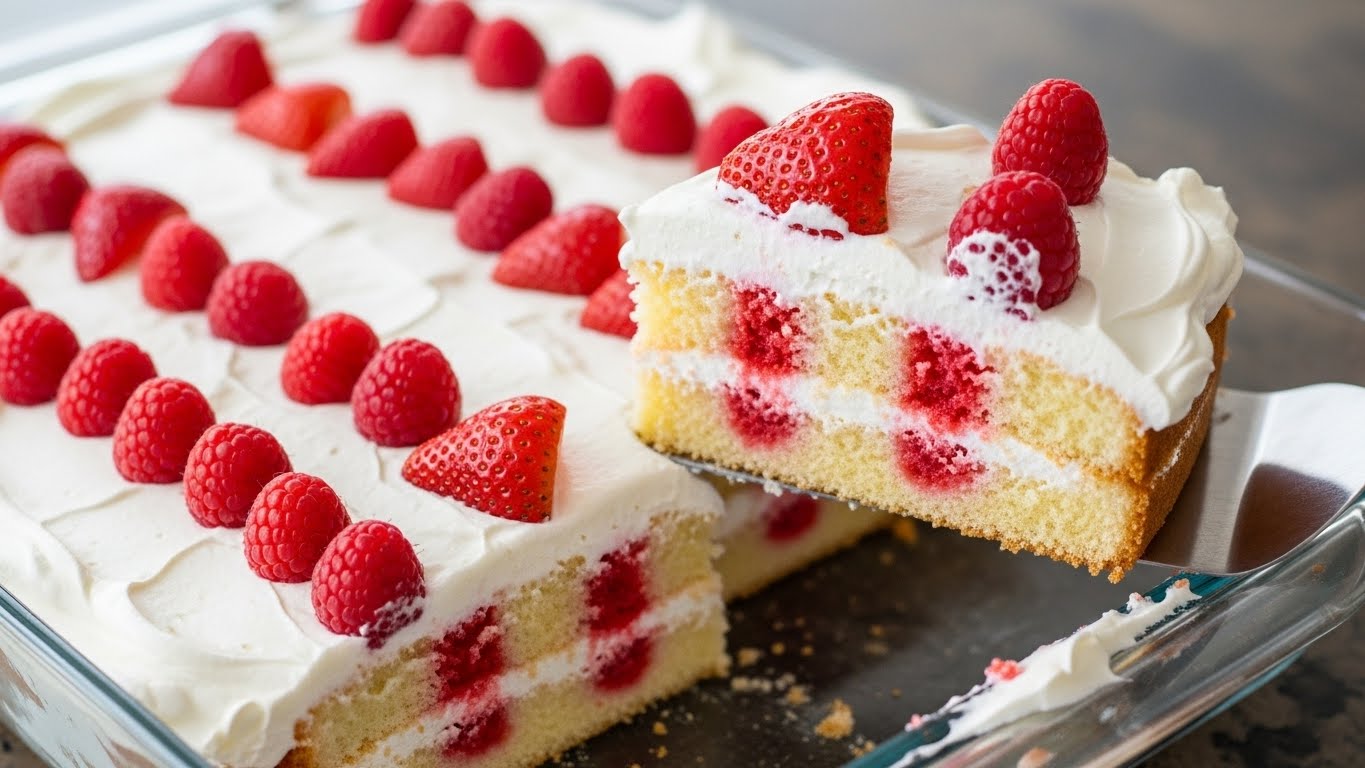
Phase 4: Chill and Top
- Refrigerate: Place the cake in the fridge. This needs to chill for at least 3 to 4 hours, or preferably overnight. The Jello needs to set inside the cake crumb.
- Frost: Once fully chilled, spread the thawed Cool Whip over the top.
- Serve: Slice, garnish with fresh fruit, and enjoy!
Best Flavor Combinations (Table)
The beauty of this jello poke cake recipe is the customization. Here are some winning combos to try:
| Theme | Cake Base | Jello Flavor | Topping/Garnish |
| Classic Summer | White Cake | Strawberry | Fresh Strawberries |
| Citrus Burst | Lemon Cake | Lime | Lime Zest |
| Creamsicle | Yellow Cake | Orange | Mandarin Oranges |
| Christmas | White Cake | Red (Cherry) & Green (Lime)* | Red/Green Sprinkles |
| Black Forest | Chocolate Cake | Cherry | Chocolate Shavings |
| Tropical | Coconut Cake | Pineapple | Toasted Coconut |
*For multi-color cakes, poke holes and pour red Jello in some rows and green in others.
How to Make a Holiday-Themed Poke Cake
Poke cakes are the chameleons of the dessert world. You can adapt this jello poke cake recipe for literally any holiday just by changing the color palette.

The 4th of July (Patriotic Cake)
This is perhaps the most famous variation.
- Bake a white cake.
- Mix one bowl of Strawberry Jello and one bowl of Blue Raspberry Jello.
- Pour the red Jello over half the cake (or alternating rows) and the blue Jello over the other half.
- Top with white Cool Whip.
- The result? Red, white, and blue stripes inside every slice!
Halloween “Slime” Cake
- Bake a chocolate cake or a dark fudge cake.
- Use Lime Jello (green) or Orange Jello.
- The contrast of the dark cake with the bright neon “slime” inside is spooky and delicious. Add gummy worms on top for extra effect.
For more holiday baking inspiration, check out our guide on Here.
Troubleshooting Common Mistakes
Even though this is an easy recipe, things can go wrong. Here is how to avoid the most common pitfalls when making your jello poke cake recipe.
- “My cake is a soggy mess!”
Cause: You likely used too much water in the Jello mix or didn’t let the cake cool enough before pouring.
Solution: Stick to the ratio of 1 cup boiling + 1/2 cup cold water. Also, ensure the cake is cool enough that it doesn’t just disintegrate, but warm enough to absorb.
- “The Jello didn’t soak in; it’s just a layer on top.”
Cause: Your holes were too small or the cake formed a hard crust.
Solution: Use a wooden spoon handle, not a toothpick. If the top crust is very hard, you might need to gently “break” the surface tension so the liquid can drain down.
- “The whipped topping is sliding off.”
Cause: You frosted the cake while it was still warm, or you didn’t chill the Jello stage long enough.
Solution: Patience! The cake must be completely cold (fridge temp) before you add the Cool Whip.
Storage and Make-Ahead Tips
One of the biggest advantages of a jello poke cake recipe is its shelf life.
- Refrigerator: Because of the gelatin and the dairy topping, this cake must be kept refrigerated. It will stay fresh and delicious for up to 4-5 days. In fact, many people argue it tastes better on day 2 because the flavors have melded.
- Freezing: Can you freeze a poke cake? Yes! You can freeze the cake after the Jello has set but before adding the whipped topping. Wrap it tightly in plastic wrap and freeze for up to 3 months. Thaw in the fridge overnight before frosting.
Nutritional Information (Estimated)
While this isn’t a health food, it is a lighter option compared to heavy cheesecakes or buttercream-frosted cakes.
- Calories per slice (1/12th of cake): ~250-300 kcal
- Carbohydrates: ~45g
- Fat: ~10g
- Protein: ~3g
Note: You can make a “lighter” version by using sugar-free Jello, sugar-free cake mix, and Lite Cool Whip. This significantly reduces the sugar content.
Frequently Asked Questions (FAQ)
Here are some questions readers often ask about this jello poke cake recipe.
- Can I use sugar-free Jello for this recipe?
Absolutely. Sugar-free Jello works exactly the same way as regular Jello in this application. It’s a great way to cut down on the overall sweetness if you find the standard recipe too sugary.
- Do I have to use Cool Whip? Can I use real whipped cream?
You can use real whipped cream, but be careful. Real whipped cream can “weep” or deflate after a day or two in the fridge. If you use real cream, I recommend adding a stabilizer (like a bit of gelatin or vanilla pudding mix) or serving the cake immediately.
- Can I use pudding instead of Jello?
Yes! That is called a “Pudding Poke Cake.” The technique is similar, but the texture is different. Pudding makes the cake creamier and richer (like a Boston Cream Pie), whereas Jello makes it fruity and moist. Both are delicious variations of the jello poke cake recipe.
- Why did my Jello pool at the bottom of the pan?
This happens if you poke the holes all the way through to the bottom crust. The liquid gravity pulls it down. Try to stop poking about 1/2 inch from the bottom of the pan to keep the colorful streaks suspended in the middle.
Conclusion: A Slice of Nostalgia
There is a reason why the jello poke cake recipe has survived for over 50 years. It brings together the simple joy of baking with the fun of color and creativity. It is moist, refreshing, and unapologetically sweet—everything a dessert should be.
Whether you are making a strawberry version for a Valentine’s treat or a lime version for St. Patrick’s Day, this cake is a blank canvas waiting for your artistic touch.
Ready to bring this retro classic back to your kitchen? Grab a box of cake mix, pick your favorite Jello color, and get ready to poke!
If you try this recipe, please leave a comment below or tag us in your photos. We’d love to see what colorful creations you come up with!