Gluten Free Bread Recipe
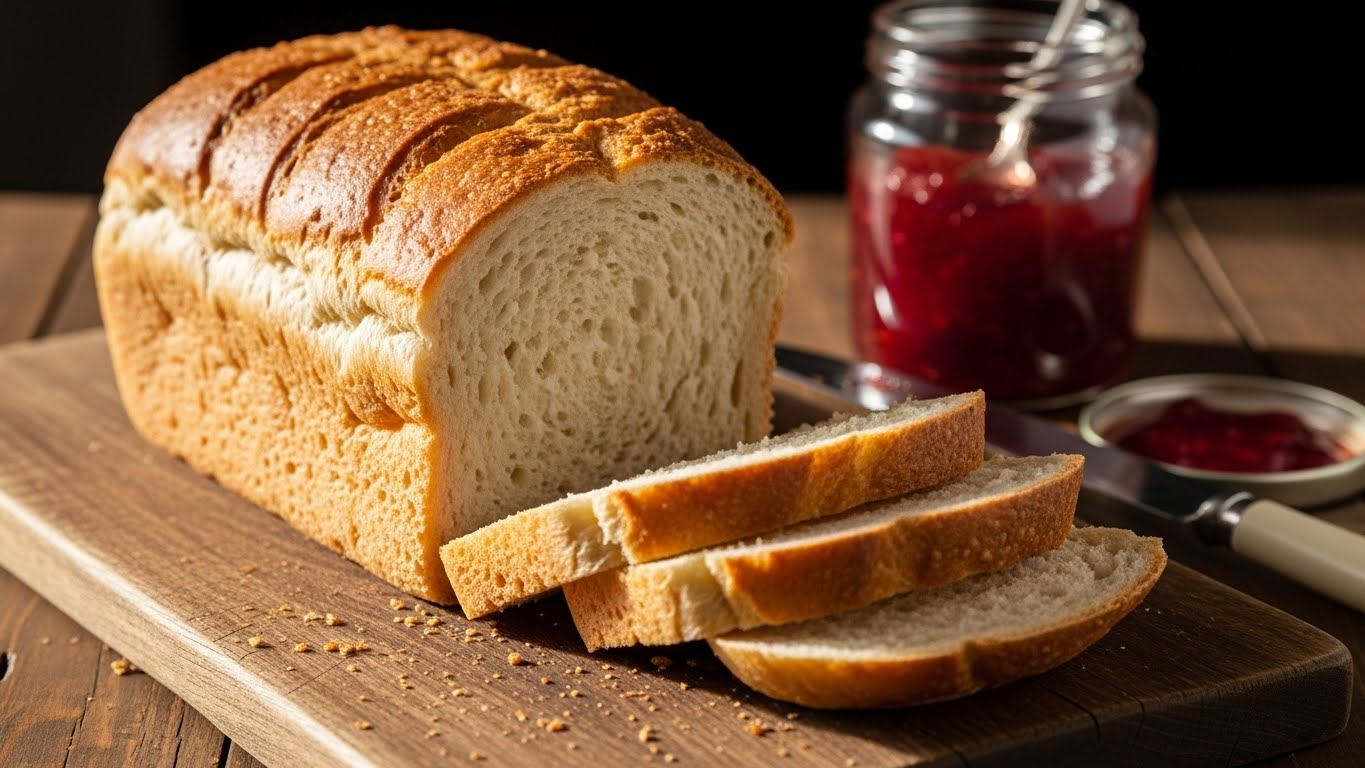
If you have been living without gluten for a while, you know the struggle is real. You walk down the grocery aisle, stare at the frozen section, and pay a premium price for a loaf of bread that is half the size of a normal one and tastes like dry sawdust. It crumbles when you touch it, and making a sandwich feels like an engineering challenge.
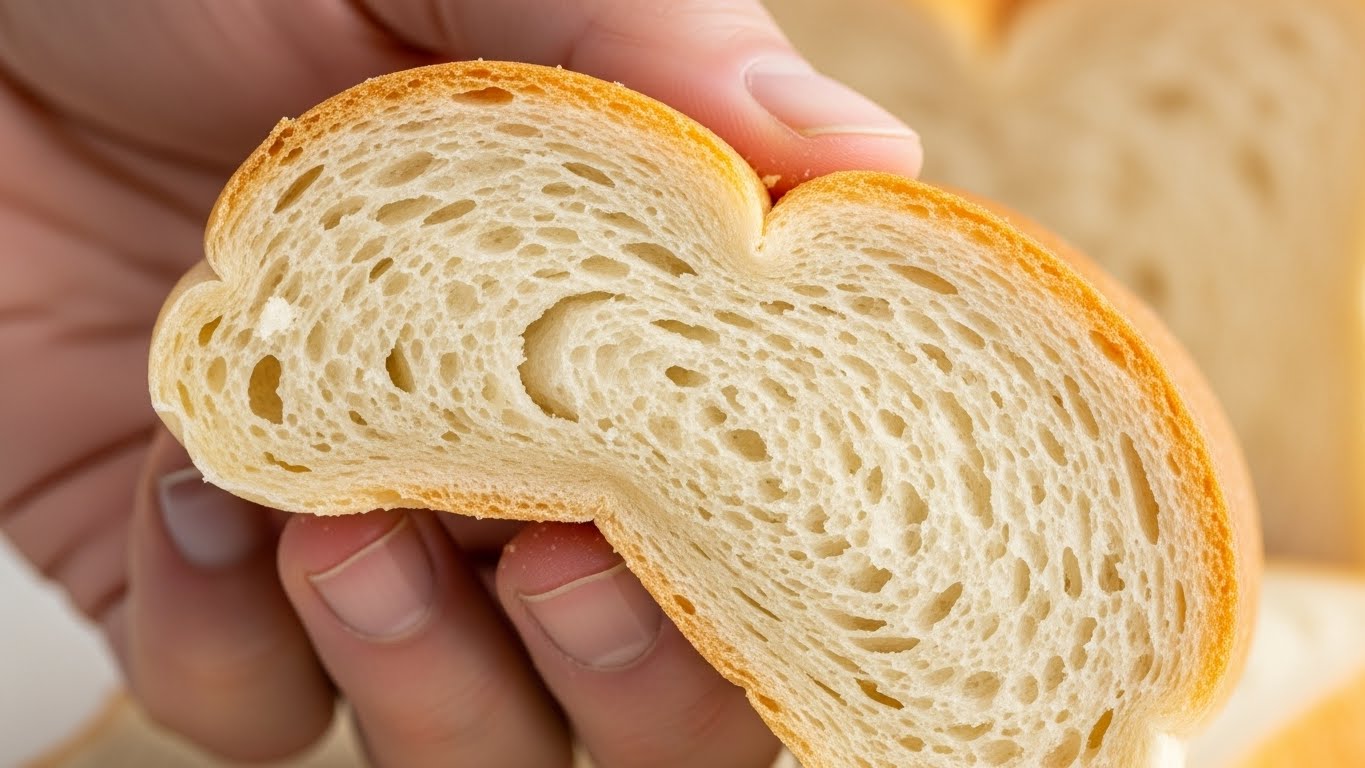
It’s time to stop settling. Finding a reliable gluten free bread recipe is the “holy grail” for celiacs and gluten-sensitive foodies. You deserve bread that bends without breaking, toasts perfectly, and actually tastes like… bread.
In this ultimate guide, I am going to walk you through a foolproof gluten free bread recipe that will change your life. We are ditching the complex, hard-to-find ingredients and sticking to a method that yields a soft, high-rising loaf every single time. Whether you are new to baking or a seasoned pro, get your mixer ready. We are about to bake the best loaf of bread you have had in years.
Why This Gluten Free Bread Recipe Works
Before we dive into the flour, let’s address the elephant in the room: Why is gluten-free baking so hard? Gluten provides elasticity and structure. Without it, bread wants to be a flat, dense brick.
This specific gluten free bread recipe succeeds where others fail because:
- Hydration Balance: We treat the dough more like a batter. High moisture content ensures the rice flours hydrate fully, preventing that gritty texture.
- Structural Support: We use the right amount of Xanthan Gum and protein (eggs) to mimic the gluten web, trapping air bubbles for a fluffy rise.
- Simplicity: No sourdough starter required, no 3-day fermentation. Just mix, rise, and bake.
If you are brand new to the world of baking, I highly recommend checking out our foundation guide on https://dailybakerhub.com/baking-for-beginners/ to familiarize yourself with measuring tools and oven basics.
Ingredients for basic GF bread
To execute this gluten free bread recipe perfectly, precision is key. Unlike wheat baking, you cannot “eyeball” gluten-free flour.
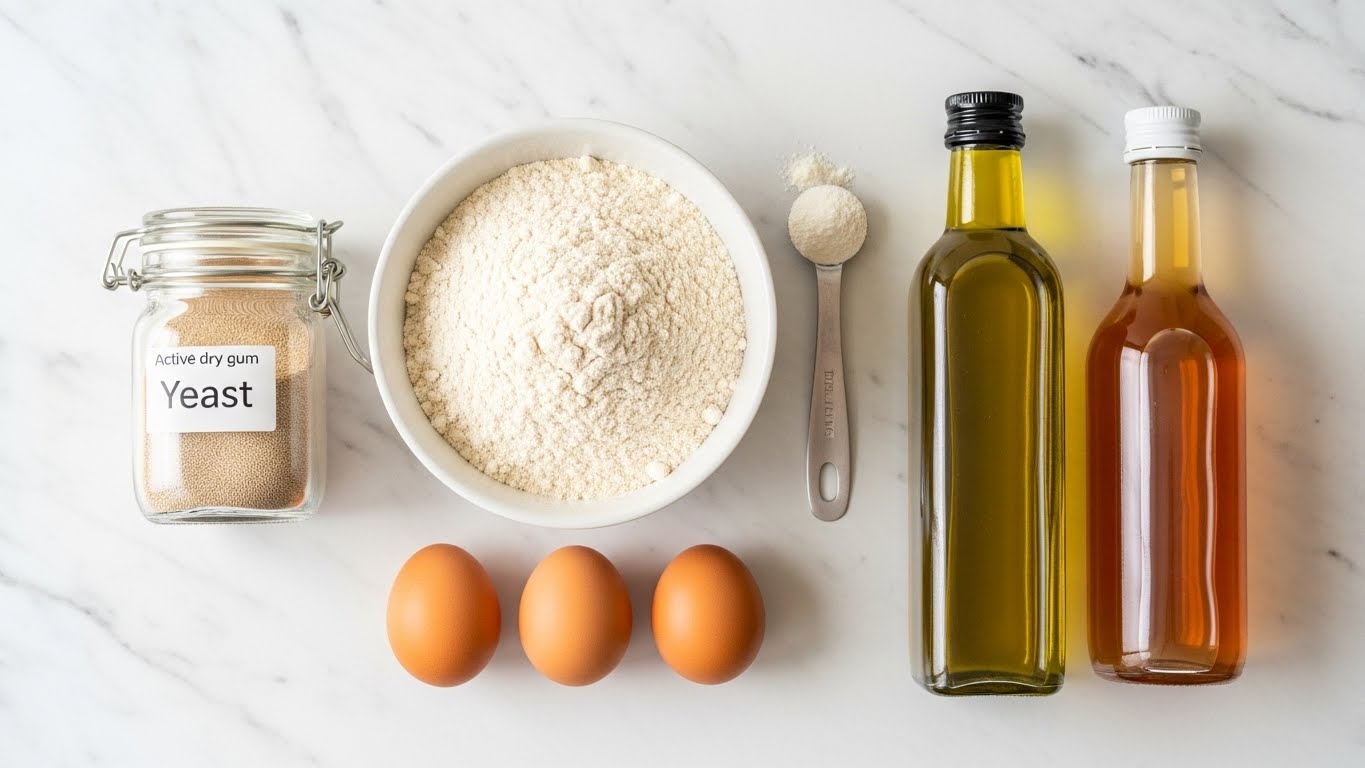
The Flour Blend (The Foundation)
You have two options here:
- Store-Bought Blend: Look for a high-quality “Measure for Measure” or “1-to-1” Gluten Free Flour Blend that includes Xanthan Gum (brands like King Arthur or Bob’s Red Mill).
- DIY Blend: If you mix your own, you’ll generally need a mix of superfine brown rice flour, potato starch, and tapioca starch. For this recipe, we assume you are using a high-quality all-purpose blend.
Binders and Leaveners
- Instant Yeast: Ensure it is labeled gluten-free. Instant yeast works faster and is more reliable than active dry for GF breads.
- Xanthan Gum: If your flour blend doesn’t have it, you must add it. It acts as the glue. Without it, your bread will crumble into sand.
- Baking Powder: A teaspoon gives an extra “lift” in the oven.
Liquids and Fats
- Warm Water (110°F): Critical for yeast activation. Too hot kills the yeast; too cold won’t wake it up.
- Eggs: Room temperature large eggs provide protein structure and richness.
- Apple Cider Vinegar: The acidity helps strengthen the dough structure and gives a slight “yeasty” tang that mimics wheat bread.
- Honey or Sugar: Yeast needs food to grow. Honey adds a lovely golden color to the crust.
- Olive Oil or Melted Butter: Keeps the crumb moist and tender.
Note on Low Carb Diets: This recipe uses rice flour and starches, so it is not keto-friendly. If you are looking for a bread that fits a ketogenic lifestyle, please visit our specific guide for https://dailybakerhub.com/low-carb-gluten-free-bread/.
Essential Equipment Checklist
You don’t need a bread machine for this. In fact, an oven often yields better results for this specific gluten free bread recipe.
- Stand Mixer (Paddle Attachment): GF dough is sticky and thick. Hand kneading is impossible, and a hand mixer might struggle. A stand mixer is your best friend.
- Digital Scale: I cannot stress this enough. Weighing your flour in grams is the only way to guarantee consistency.
- 8×4 or 9×5 Loaf Pan: Metal pans conduct heat better than glass for bread.
- Instant Read Thermometer: To check water temperature and bread doneness.
Step-by-step mixing and rising
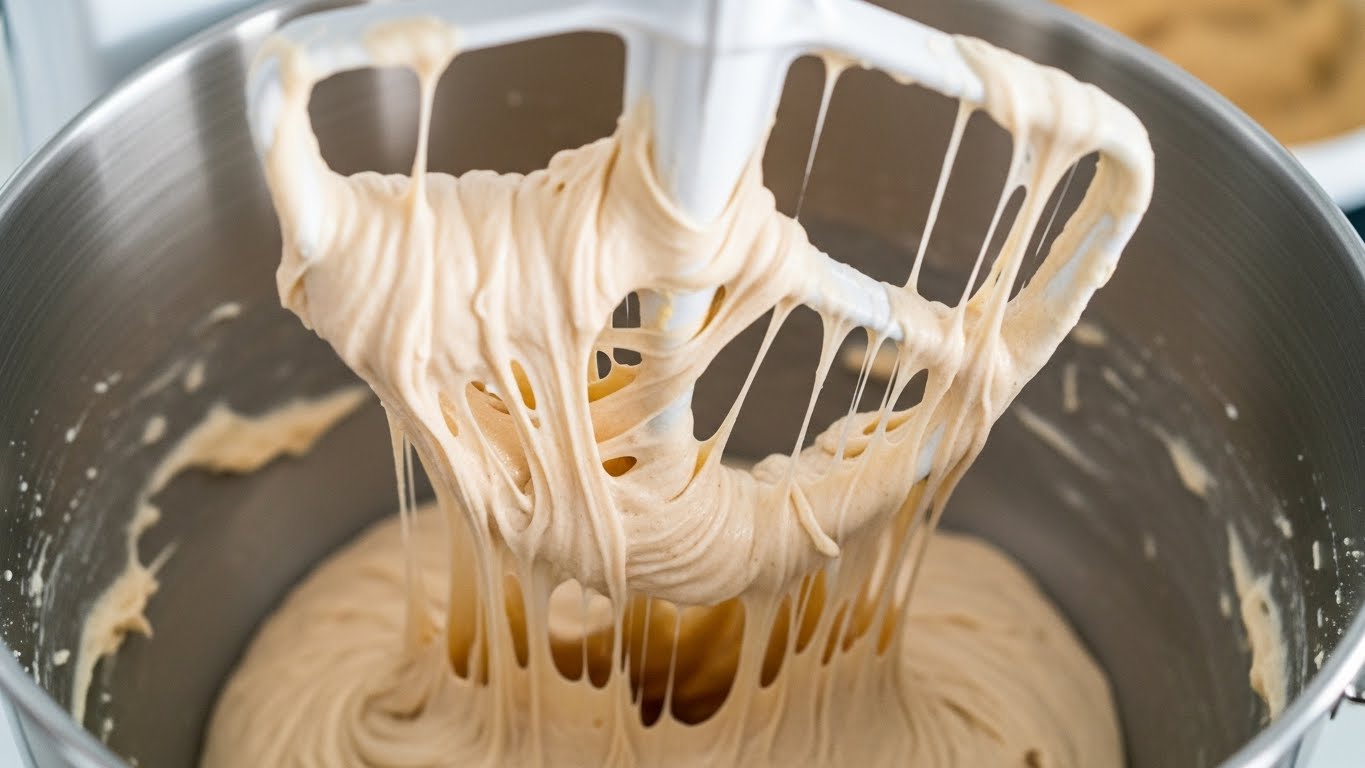
Forget everything you know about traditional kneading. Making gluten free bread recipe dough is more like mixing a thick cake batter.
Phase 1: Activate the Yeast
- In the bowl of your stand mixer, combine the warm water (110°F) and honey (or sugar).
- Sprinkle the yeast on top and whisk gently.
- Let it sit for 5-10 minutes. It should become foamy and bubbly. If it doesn’t foam, your yeast is dead. Throw it out and start over.
Phase 2: The Mixing Process
- Add Wet Ingredients: Add the eggs, oil, and vinegar to the yeast mixture. Mix briefly on low speed.
- Add Dry Ingredients: In a separate bowl, whisk your GF flour blend, xanthan gum (if adding separately), baking powder, and salt.
- Combine: With the mixer running on low, slowly add the dry ingredients.
- The Beat: Once incorporated, increase the speed to medium-high and beat for 3 to 5 minutes.
- Why? Since there is no gluten to overdevelop, you need to beat air into the batter to help structure the loaf. The batter should look like thick, sticky frosting.
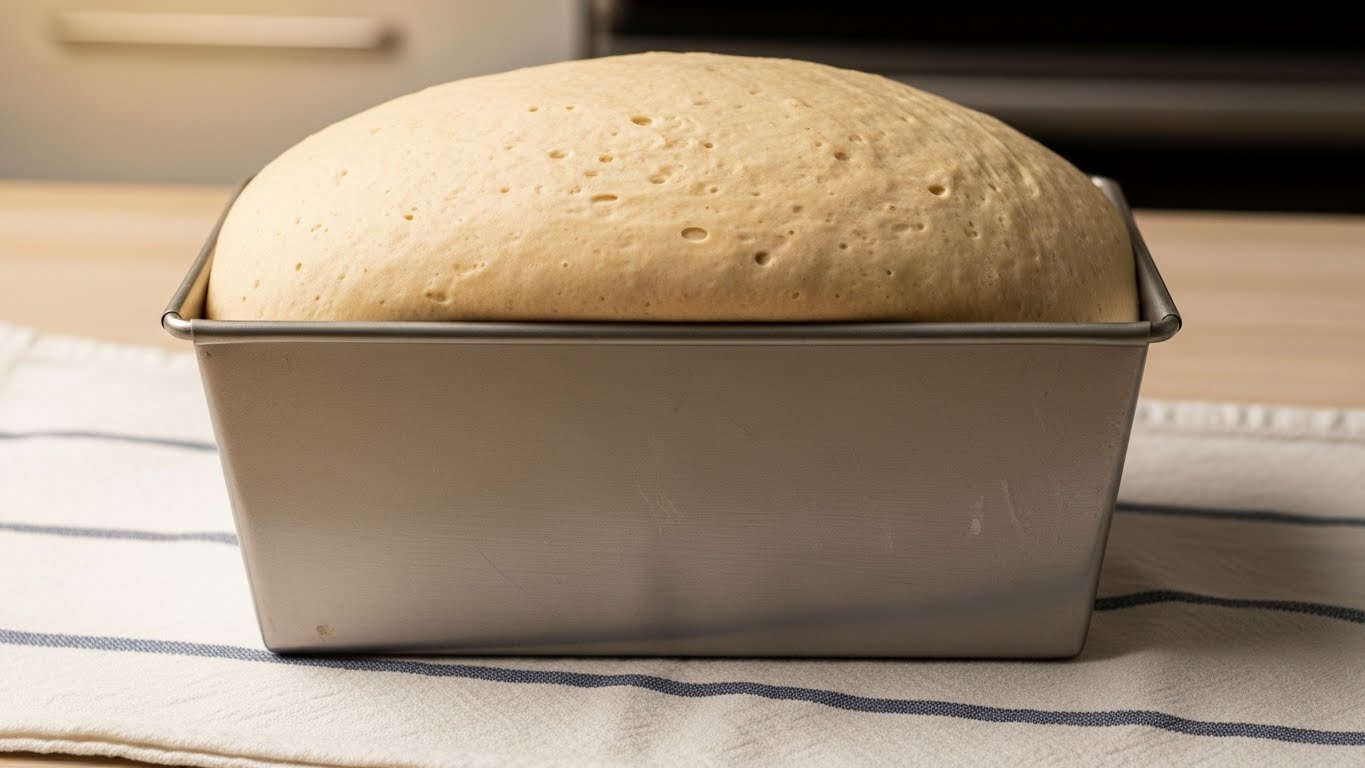
Phase 3: Shaping and Rising (Proofing)
- Pan Prep: Grease your loaf pan generousely.
- Transfer: Scrape the sticky dough into the pan.
- Smooth: Wet a spatula or your fingers with water (water prevents sticking) and smooth the top of the loaf into a nice dome shape.
- The Rise: Cover loosely with greased plastic wrap or a shower cap. Place in a warm, draft-free spot for 40 to 60 minutes.
- Goal: The dough should rise just to the top edge of the pan. Do not let it rise too high over the rim, or it might collapse in the oven.
Baking, cooling, and slicing tips
This is the home stretch. How you bake and cool determines if your gluten free bread recipe turns out gummy or perfect.
Baking Instructions
- Preheat: While the bread rises, preheat your oven to 350°F (175°C).
- Bake: Place the loaf on the center rack. Bake for 40 to 50 minutes.
- Visual Cue: The crust should be a deep golden brown.
- Temp Check: The internal temperature of the bread should reach 205°F to 210°F (96°C-99°C). GF bread needs a higher internal temp than wheat bread to ensure the starches are fully set.
The Golden Rule of Cooling
Do not slice the bread while it is hot!
I know it smells amazing. I know you want warm buttered toast. But if you slice hot gluten-free bread, you will release the steam that is still cooking the center. The result will be a gummy, sticky mess.
- Remove from pan immediately and place on a wire rack.
- Let it cool completely for at least 2 to 3 hours.
Slicing Technique
Once cool, use a sharp serrated bread knife. Use a gentle sawing motion rather than pressing down, to preserve the airy texture.
Troubleshooting Common GF Bread Issues
Even with the best gluten free bread recipe, variables like humidity and flour brands can affect the outcome.
| Problem | Likely Cause | Solution |
| Bread Sunk in Middle | Over-proofing (rose too long) or too much liquid. | Reduce rise time by 10 mins; measure flour by weight. |
| Gummy/Wet Texture | Sliced while hot or underbaked. | Wait until completely cool; bake to 210°F internal temp. |
| Dense/Brick-like | Not enough liquid or dead yeast. | Check yeast freshness; ensure dough is sticky, not dry. |
| Large Holes (Tunnels) | Didn’t smooth the dough enough or rose too fast. | Bang the pan on counter before rising to pop air pockets. |
Storage and Freezing
Gluten-free bread dries out faster than wheat bread because it lacks preservatives.
- Countertop: Store in an airtight container for up to 2 days.
- Refrigerator: Avoid! The fridge speeds up staling (retrogradation) of the starch.
- Freezer (Best Method): Slice the entire cooled loaf. Place parchment paper between slices. Freeze in a heavy-duty bag. When you want a slice, pop it straight into the toaster. It tastes fresh-baked every time!
Flavor Variations
Once you master this base gluten free bread recipe, get creative!
- Cinnamon Raisin: Add 1 tsp cinnamon and 1/2 cup raisins during the final mix.
- Everything Bagel Bread: Brush the top with egg wash and sprinkle generous amounts of “Everything Bagel” seasoning before baking.
- Seeded Loaf: Mix in sunflower seeds, flax seeds, and pumpkin seeds for crunch and nutrition.
Comparison: Gluten Free vs. Low Carb Bread
Many people confuse “Gluten Free” with “Low Carb/Keto.” They are not the same.
- Gluten Free Bread: Uses rice flour, potato starch, tapioca. It is high in carbs but safe for Celiacs. The texture is closest to white sandwich bread.
- Low Carb/Keto Bread: Uses almond flour, coconut flour, psyllium husk. It is low in carbs but has a denser, nuttier texture.
If you realize you actually need a low-carb option, head over to our detailed guide on https://dailybakerhub.com/low-carb-gluten-free-bread/.
Frequently Asked Questions (FAQ)
Here are the most common questions I get about this gluten free bread recipe.
- Can I make this dairy-free?
Absolutely. This recipe uses oil, so it is naturally dairy-free. If a recipe calls for milk, you can substitute unsweetened almond milk or soy milk 1:1 without affecting the texture significantly.
- Can I use a bread machine for this recipe?
Yes, but with a caveat. Most bread machines have a “knead” cycle that is too long for GF dough (which doesn’t need kneading). If your machine has a specific “Gluten Free” setting, use it. If not, stick to the oven method for better control.
- Why is my bread so crumbly?
Crumbly bread usually means a lack of binders. Did you forget the Xanthan Gum? Or perhaps you measured the flour by volume (cups) instead of weight, resulting in too much flour and not enough liquid.
- Can I substitute the eggs?
Eggs are crucial for structure in GF baking. You can use flax eggs (ground flaxseed + water) or commercial egg replacers, but the loaf will likely be shorter and denser. It won’t have the same fluffy rise as the version with real eggs.
Conclusion: The Joy of Real Bread
There is nothing quite like the smell of fresh bread baking in the oven—it makes a house feel like a home. For those of us on a gluten-free diet, reclaiming that simple joy feels like a major victory.
This gluten free bread recipe is more than just ingredients in a bowl; it is freedom. Freedom to have a grilled cheese, freedom to pack a sandwich for lunch, and freedom from dry, disappointing alternatives.
Ready to bake? Check your pantry for that GF flour blend, warm up your water, and let’s make some magic.
If you try this recipe, please leave a comment below or tag us in your photos. We love seeing your beautiful, high-rising loaves!
Pingback: Gluten Free Banana Bread Recipe – Soft, Moist, and Easy - Bestbaking Recipes
Pingback: Is Baking Powder Gluten Free? What You Need to Know - Bestbaking Recipes