How to Cake
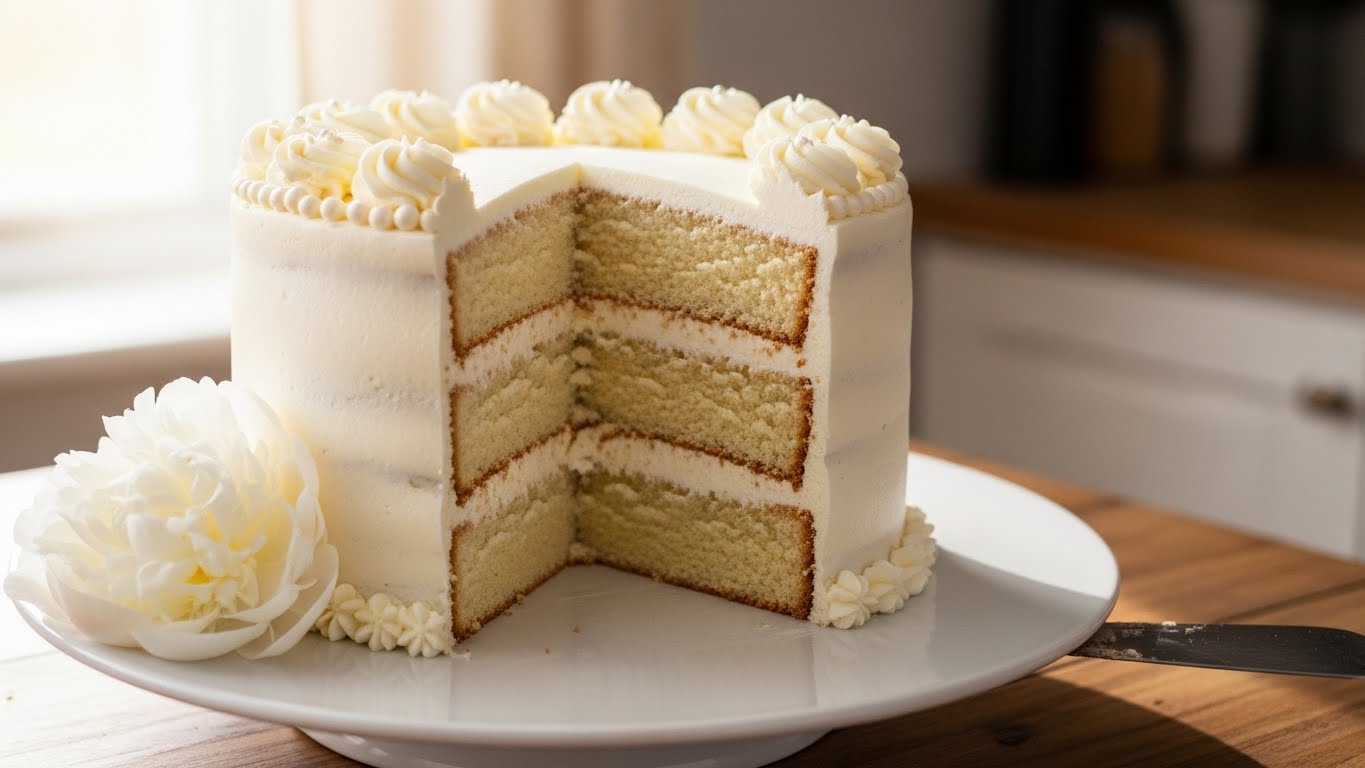
Have you ever watched a baking show and thought, “I wish I could do that”? You are not alone. There is a certain magic in taking simple ingredients like flour, sugar, and eggs and transforming them into a towering edible masterpiece. Whether you are baking for a birthday, a wedding, or just a Tuesday night craving, learning how to cake properly is a life skill that brings joy to everyone around you.
But let’s be honest: “Caking” is an art form. It involves science, precision, and a bit of artistic flair. Many home bakers struggle with dry sponges, lopsided layers, or frosting that looks messy. The good news? You don’t need a culinary degree to master this.
In this ultimate guide, we are going to break down the entire process. We aren’t just giving you a recipe; we are teaching you the methodology. From mixing the perfect batter to achieving those bakery-smooth sides, this post is your roadmap on how to cake like a professional. Let’s preheat that oven and get started!
Essential tools and ingredients
Before you crack a single egg, you need to set your kitchen up for success. Learning how to cake efficiently starts with having the right equipment. You don’t need expensive gadgets, but you do need the basics.
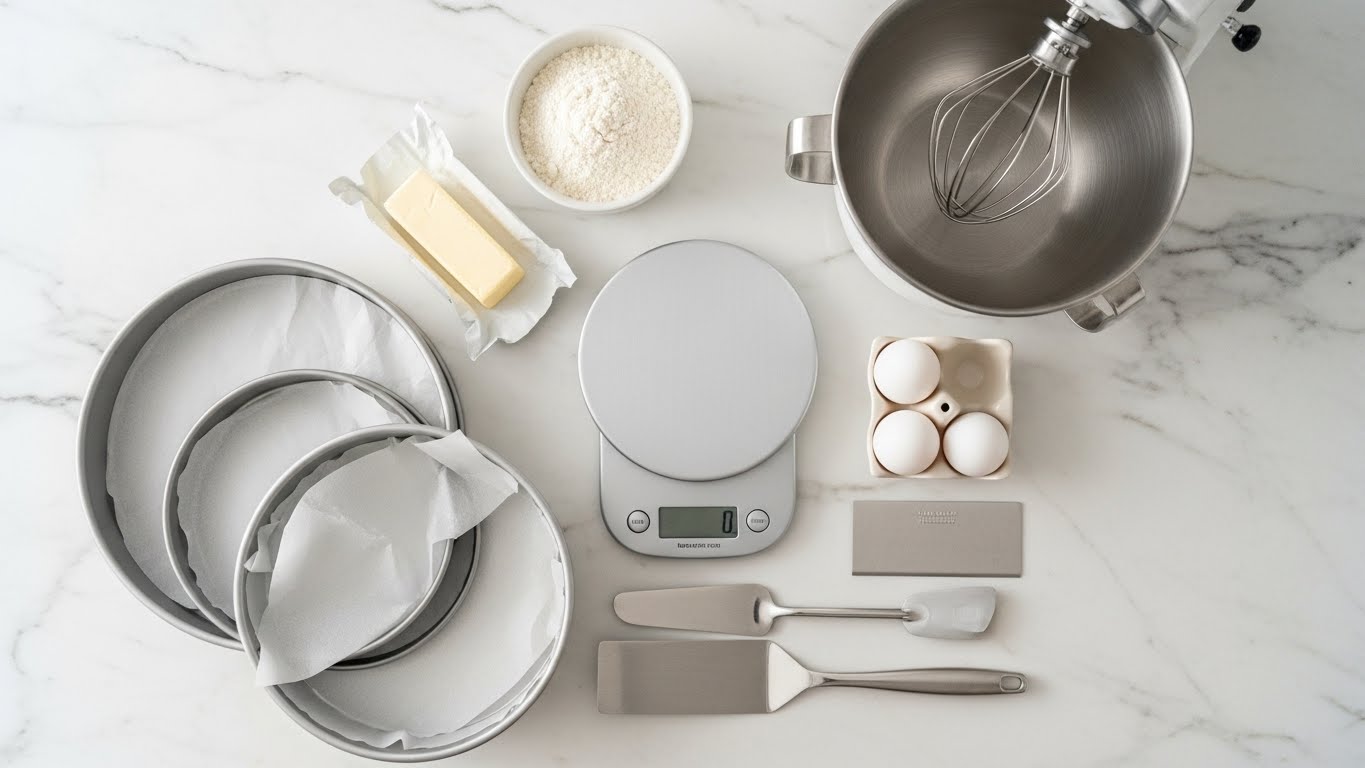
The Toolkit for Success
- Digital Scale: I cannot stress this enough. Baking is chemistry. Measuring cups can vary, but a gram is always a gram. This is crucial for consistent results.
- Stand Mixer or Hand Mixer: While you can mix by hand, a mixer ensures your butter and sugar are properly aerated (creamed), which is the secret to a fluffy cake.
- Cake Pans: Invest in light-colored aluminum pans (8-inch or 9-inch rounds). Dark pans absorb too much heat and can burn the crust before the center is cooked.
- Offset Spatula: This is the tool that separates amateurs from pros. It allows you to spread frosting smoothly without your knuckles dragging in the icing.
- Turntable: A rotating cake stand makes smoothing the sides of your cake infinitely easier.
- Bench Scraper: For getting those perfectly straight, smooth sides on your frosting.
The Core Ingredients
When learning how to cake, ingredient quality matters.
- Cake Flour vs. All-Purpose: Cake flour has less protein (gluten), resulting in a tender, velvety crumb. All-purpose flour makes a sturdier cake.
- Fats (Butter and Oil): Butter provides flavor; oil provides moisture. Many professional recipes use a mix of both.
- Leavening Agents: Baking powder and baking soda. Make sure they are fresh! If your baking powder is six months old, toss it.
- Room Temperature Dairy: This is a non-negotiable rule. Your eggs, milk, and butter must be at room temperature to emulsify properly. Cold ingredients lead to curdled batter and dense cakes.
For a deeper dive into ingredient preparation, check out our comprehensive guide on https://dailybakerhub.com/baking-tips/.
Understanding Cake Structure: Butter vs. Sponge
To truly understand how to cake, you need to know what type of cake you are making.
- Butter Cakes (Creaming Method)
These are the standard birthday cakes (Yellow Cake, Pound Cake). They rely on creaming butter and sugar to create air bubbles. They are sturdy, moist, and easy to stack.
- Sponge Cakes (Foam Method)
These rely on whipped eggs for volume (Genoise, Chiffon). They are lighter, airier, and absorb syrups well. If you are looking for something fun and incredibly moist that uses a different technique, you might want to explore our https://dailybakerhub.com/jello-poke-cake-recipe/.
Step-by-step: from batter to baked cake
This is where the magic happens. We will focus on the “Creaming Method” as it is the foundation of how to cake for most home bakers.
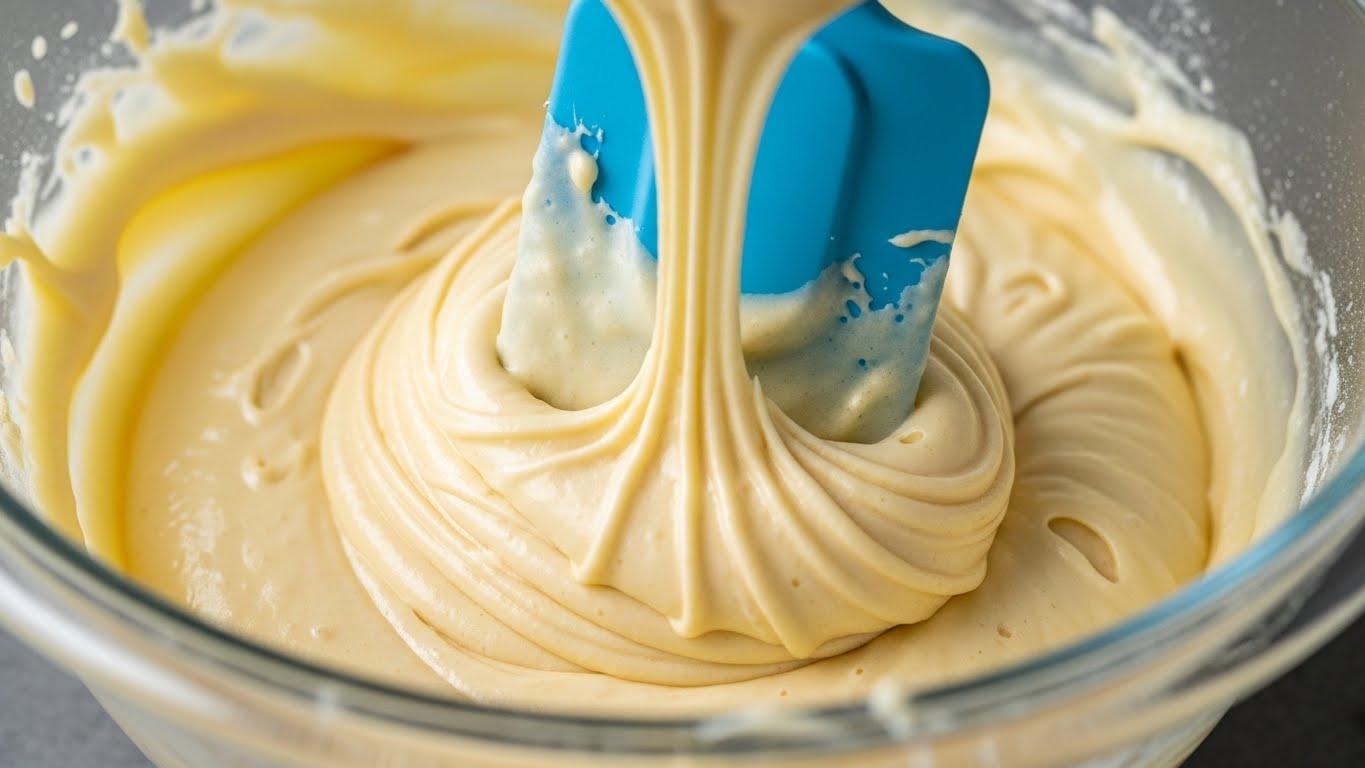
Step 1: Creaming Butter and Sugar
Place your room-temperature butter and sugar in the mixer bowl. Beat on medium-high speed for 3 to 5 minutes.
- Why? You aren’t just mixing; you are punching millions of tiny air holes into the butter. The mixture should look pale yellow and fluffy. This step determines the height of your cake.
Step 2: Adding Eggs
Add eggs one at a time, beating well after each addition. Scrape down the sides of the bowl. If you add them all at once, the batter will separate.
Step 3: Dry and Wet Alternation
In a separate bowl, whisk your flour, salt, and leavener. Combine your milk and vanilla in a jug.
- Add 1/3 of the dry mix -> Mix.
- Add 1/2 of the wet mix -> Mix.
- Repeat, ending with the dry ingredients.
- Crucial Rule: Stop mixing the moment the flour disappears. Overmixing develops gluten, turning your soft cake into chewy bread.
Step 4: Pan Prep and Baking
Grease your pans and line the bottoms with parchment paper. This guarantees your cake won’t stick.
- Weigh the batter: To ensure your layers are even, weigh the batter as you pour it into the pans.
- Bake: Place pans on the center rack. Do not open the oven door until at least 80% of the baking time has passed to prevent sinking.
Cooling and Leveling: The Secret to Straight Cakes
You can’t learn how to cake perfectly if your foundation is crooked.
The Cooling Process
- Let the cakes cool in the pan for 10-15 minutes.
- Flip them onto a wire rack to cool completely.
- Pro Tip: Wrap the warm cakes in plastic wrap and freeze them for an hour. This locks in moisture and makes the cake firmer and easier to trim.
Leveling the Layers
Most cakes bake with a slight dome on top. To stack them, you need them flat.
- Use a serrated bread knife or a cake leveler.
- Get down to eye level and saw gently back and forth to cut off the dome.
- Don’t throw away the scraps! Use them for cake pops or a snack.
Basic frosting and decorating techniques
Now for the fun part. The decoration is what people see first. Mastering how to cake means mastering the spatula.
- Making the Frosting (American Buttercream)
For beginners, American Buttercream is the easiest.
- Beat room-temperature butter until pale (5 minutes).
- Gradually add powdered sugar, a splash of heavy cream, vanilla, and a pinch of salt.
- Beat for another 5 minutes until creamy and airy.
- The Crumb Coat
This is the most important step in decorating.
- Stack your layers with frosting in between.
- Apply a very thin layer of frosting all over the cake. It doesn’t need to look pretty; it just needs to seal in the crumbs.
- Chill: Put the cake in the fridge for 20 minutes until the crumb coat is hard to the touch.
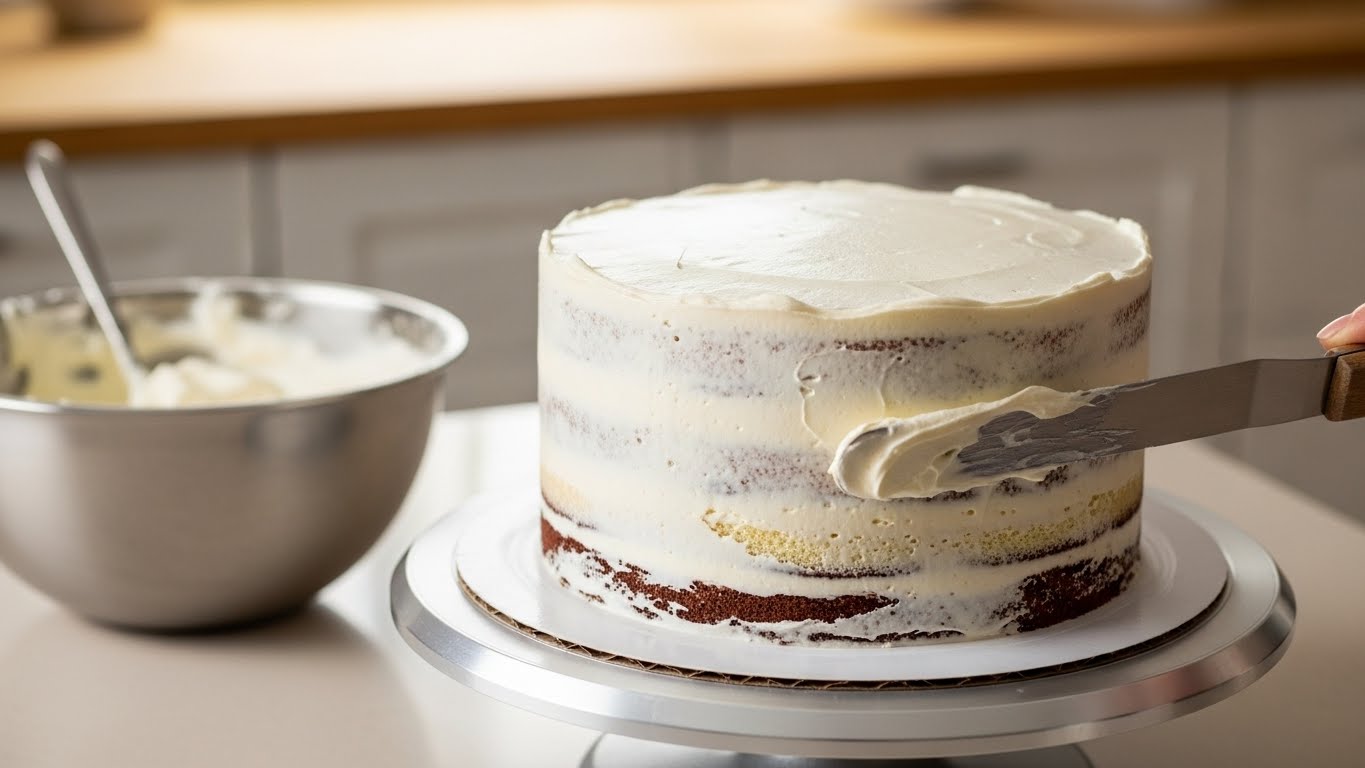
- The Final Coat
- Apply a thick layer of frosting on top and sides.
- Use your offset spatula to spread it roughly.
- Use your bench scraper held at a 45-degree angle against the side of the cake. Rotate the turntable while holding the scraper still. This smooths the frosting and removes excess.
- Sharp Edges
To get those professional sharp edges on top:
- Smoothing the sides will push a “lip” of frosting up above the top edge.
- Use your offset spatula to gently pull that lip toward the center of the cake. Wipe the spatula clean after every stroke.
Troubleshooting Common Cake Disasters
Learning how to cake involves learning how to fix mistakes.
| Problem | Likely Cause | Solution |
| Cake Sunk in Middle | Underbaked or opened oven too early. | Check oven temp; use a skewer to test doneness. |
| Cake is Dry | Overbaked or too much flour. | Weigh ingredients; check cake 5 mins early. |
| Frosting has Bubbles | Air beaten into frosting. | Stir frosting by hand with a spatula to push air out. |
| Layers are Sliding | Frosting too soft or kitchen too hot. | Chill the cake; ensure frosting is stiff enough. |
Advanced “Caking” Tips for Professionals
Once you have the basics down, here is how to cake at the next level.
Flavor Syrups (The Soak)
Professional bakeries often brush their cake layers with simple syrup (equal parts sugar and water, boiled). This keeps the cake moist for days and adds extra flavor (e.g., lemon syrup, coffee syrup).
The Drip Technique
The popular “drip cake” look is achieved with chocolate ganache.
- Ratio: 1 part chocolate to 1 part heavy cream.
- Let it cool until it is the consistency of thick honey before pouring it over the cold cake.
Stacking Tiers
If you want to make a wedding cake, you need support. Never stack one cake directly on top of another without dowels (wooden or plastic rods) inserted into the bottom tier to hold the weight.
How to Store and Transport Your Cake
You have put in the work; now protect your creation.
- Room Temperature: A buttercream-frosted cake can sit out for 2-3 days (unless it has a custard or fruit filling).
- Fridge: If it is hot, refrigerate the cake. However, butter-based cakes get hard in the fridge. Key Tip: Take the cake out of the fridge 2-3 hours before serving so it returns to room temperature and softens up.
- Transportation: Place the cake box on the floor of the car (the flattest surface), not on the seat. Drive like you are carrying a newborn baby!
Frequently Asked Questions (FAQ)
Here are common questions from beginners learning how to cake.
- How far in advance can I bake cake layers?
You can bake cake layers up to 3 days in advance if you wrap them tightly in plastic wrap and store them in the fridge. Better yet, wrap them and freeze them for up to a month. Frozen layers are easier to frost!
- Why is my frosting gritty?
If your American buttercream is gritty, you likely didn’t sift your powdered sugar, or you didn’t beat the butter long enough. You can also try using organic powdered sugar which sometimes dissolves better, or switch to Swiss Meringue Buttercream for a silkier texture.
- How to cake without a turntable?
While a turntable makes it easier, you can hack it. Place your cake on a plate, and place that plate on a “Lazy Susan” spice rack. Or, just move your body around the cake as you smooth it!
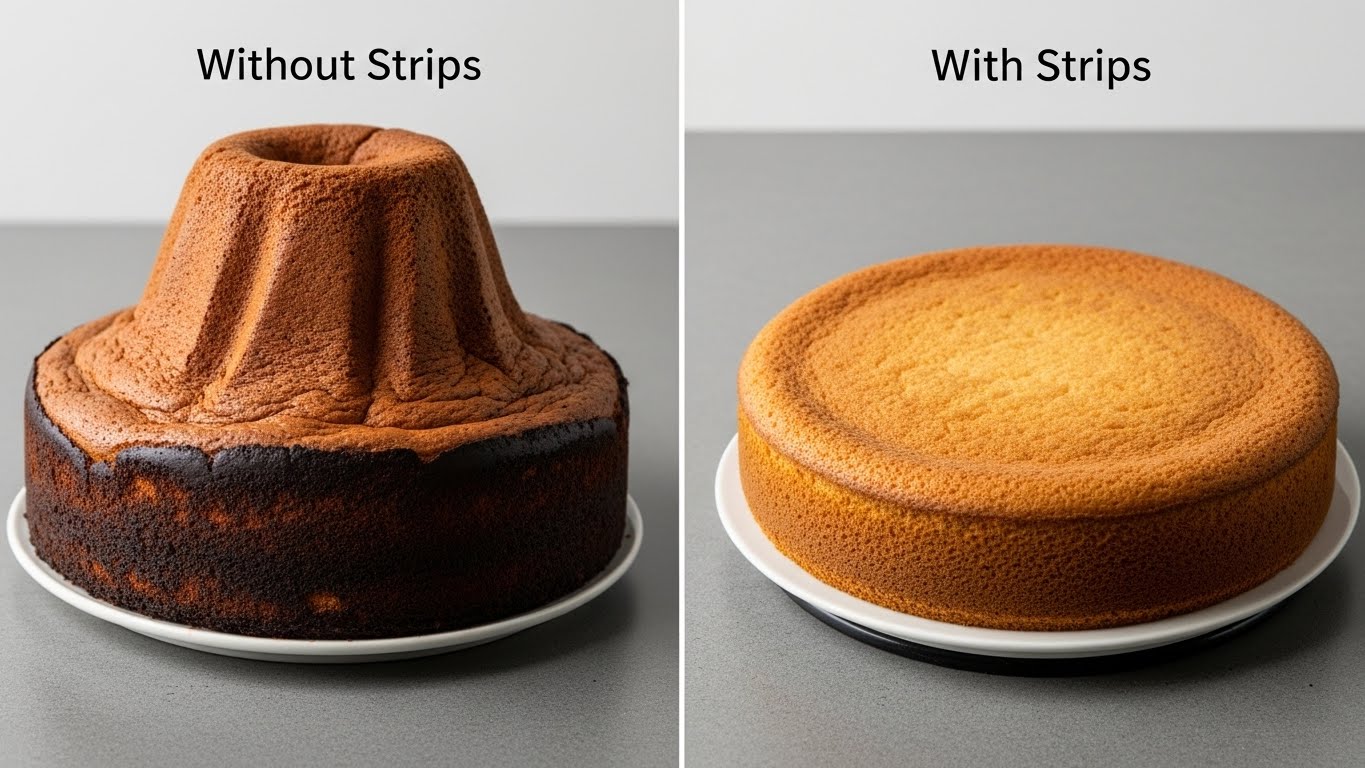
- My cake dome is huge. How do I prevent it?
High domes happen when the edges cook much faster than the center. You can use “cake strips” (wet fabric strips wrapped around the pan) to insulate the edges. This forces the cake to bake evenly and flat, saving you from cutting off wasted cake.
Conclusion: Your Journey to Cake Mastery
Learning how to cake is a journey, not a destination. Your first cake might be a little lopsided. Your frosting might have crumbs in it. And that is perfectly okay. The most important ingredient in any cake is the love and effort you put into it.
By following the steps in this guide—measuring by weight, respecting temperature, and practicing your smoothing technique—you are already ahead of 90% of home bakers.
Remember, every professional baker started exactly where you are now: standing in a kitchen with a bag of flour and a dream. So, grab that spatula, preheat your oven to 350°F, and go make something delicious.
Ready to try your new skills? Start with a simple vanilla sponge, or challenge yourself with our detailed guides linked above. Happy Caking!
Pingback: Baking Tips for Beginners – Start Confidently with These Basics - Daily Baker Hub