Gluten Free Sourdough Bread
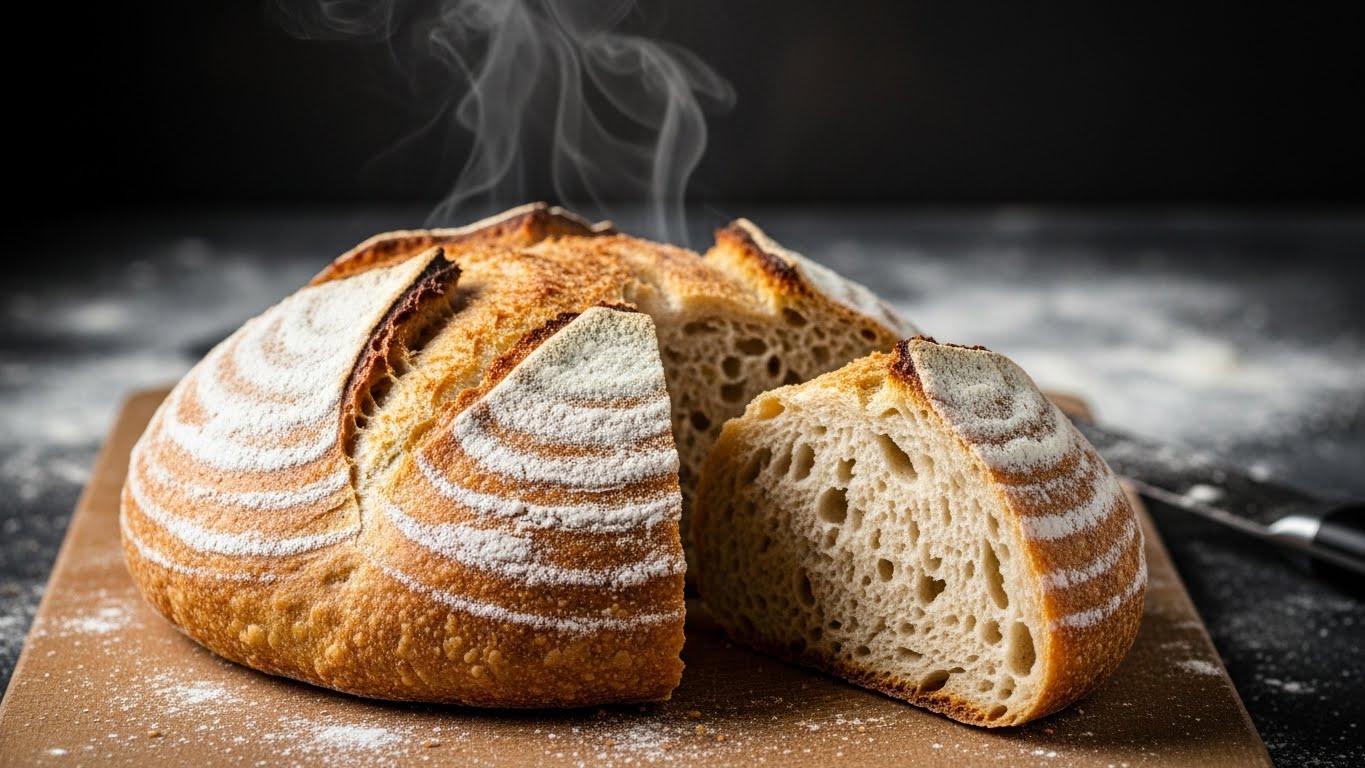
For anyone who has had to give up gluten, the hardest farewell is often the artisan loaf. You know the kind: a dark, crackling crust that sings when you squeeze it, an open, airy crumb, and that signature tangy flavor that only wild fermentation can produce. Most store-bought options are disappointing—dense, dry, or crumbling apart before they even hit the toaster.
But here is the truth: you do not have to say goodbye to real bread. Gluten free sourdough bread is not only possible; it can be absolutely magnificent.
Unlike yeasted gluten-free breads which often rely on sugar and instant yeast for a quick rise, gluten free sourdough bread is a labor of love and time. It uses a wild yeast starter to ferment the dough, breaking down starches and creating a depth of flavor and texture that is miles ahead of any commercial substitute. In this comprehensive guide, I will walk you through the science, the ingredients, and the exact method to bake a loaf that is rustic, chewy, and completely wheat-free. It’s time to bring the bakery back into your kitchen.
What makes gluten free sourdough different?
When we talk about traditional sourdough, we rely heavily on gluten—the protein network in wheat that traps gas bubbles and allows the bread to rise high and hold its shape. So, when we tackle gluten free sourdough bread, we are essentially baking without the main structural component. This is why simply swapping flour types 1:1 never works.
The Science of the “Fake” Gluten Network
To create a successful loaf, we have to mimic gluten. In gluten free sourdough bread, we use a combination of hydrocolloids (binders) and hydration.
- The Binder: Usually Psyllium Husk or Xanthan Gum. Psyllium is preferred for artisan loaves because it creates a gel that is remarkably similar to gluten’s elasticity.
- The Fermentation: Without gluten to “overwork,” we rely on the fermentation process of the sourdough starter to hydrate the flours fully and create aeration.
Flavor Profile Differences
Wheat sourdough has a distinct malty, toasted flavor. Gluten free sourdough bread, depending on the flours used (like sorghum, buckwheat, or brown rice), often has a nuttier, earthier profile. The “sour” tang is often cleaner and sharper because there are no competing wheat flavors.
Texture Expectations
Let’s manage expectations: you will likely not get the massive “oven spring” (explosion of height) that a white wheat flour loaf has. However, a well-made gluten free sourdough bread will have a legitimate crust—crispy and thick—and a crumb that is moist, open, and chewy, not cake-like or sandy.
Key ingredients and tools you’ll need
You cannot build a house without bricks, and you cannot bake gluten free sourdough bread without the right pantry staples. Precision is even more critical here than in traditional baking.
The Flour Blend (The Foundation)
Do not use a generic “All-Purpose GF Blend” that is mostly starch. Sourdough needs protein and whole grains to ferment properly.
- Whole Grain Flours: Brown Rice Flour, Sorghum Flour, Buckwheat Flour, or Millet Flour. These provide structure and flavor.
- Starches: Tapioca Starch (or Arrowroot) and Potato Starch. These lighten the loaf and help with the crust.
The Magic Binder: Psyllium Husk
If there is one non-negotiable ingredient, it is whole psyllium husk (or rough powder). It absorbs huge amounts of water and turns into a jelly-like substance that holds the gas bubbles inside the dough. Without it, your bread will be a flat pancake.
Salt and Water
- Sea Salt: Essential for flavor and controlling fermentation.
- Water: Use filtered water. Chlorine in tap water can kill the wild yeast in your starter.
Essential Tools Checklist
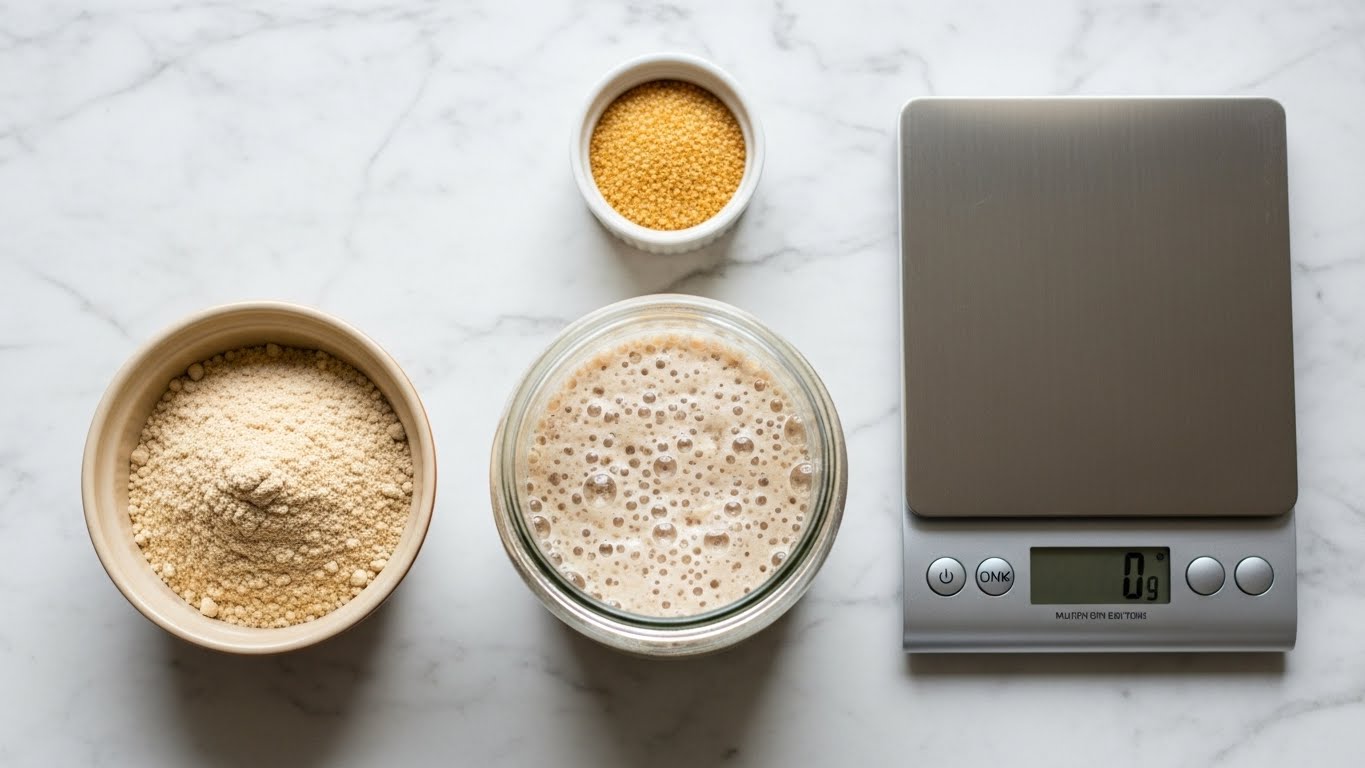
- Digital Kitchen Scale: Volume measurements (cups) are too inaccurate for gluten free sourdough bread. We bake by gram.
- Dutch Oven: Essential for trapping steam to create a crispy crust.
- Banneton (Proofing Basket): Helps the dough hold its shape while rising.
- Parchment Paper: Prevents sticking.
- Razor Blade or Lame: For scoring the bread to control expansion.
Note: If you are new to the world of gluten-free baking and want to explore other types of loaves before tackling sourdough, check out our guide to 20 best gluten free bread recipes from sandwich to artisan loaves. It covers everything from soft sandwich bread to focaccia.
Creating and Maintaining a Gluten-Free Starter
You cannot make sourdough without a starter. If you don’t have one yet, here is the quick rundown. You cannot use a wheat starter for gluten free sourdough bread; you must grow a dedicated GF culture.
Best Flours for GF Starters
- Brown Rice Flour: The gold standard. It ferments reliably and smells lovely (like sweet yogurt).
- Sorghum Flour: Very active but can smell a bit funky in the beginning.
The Feeding Routine
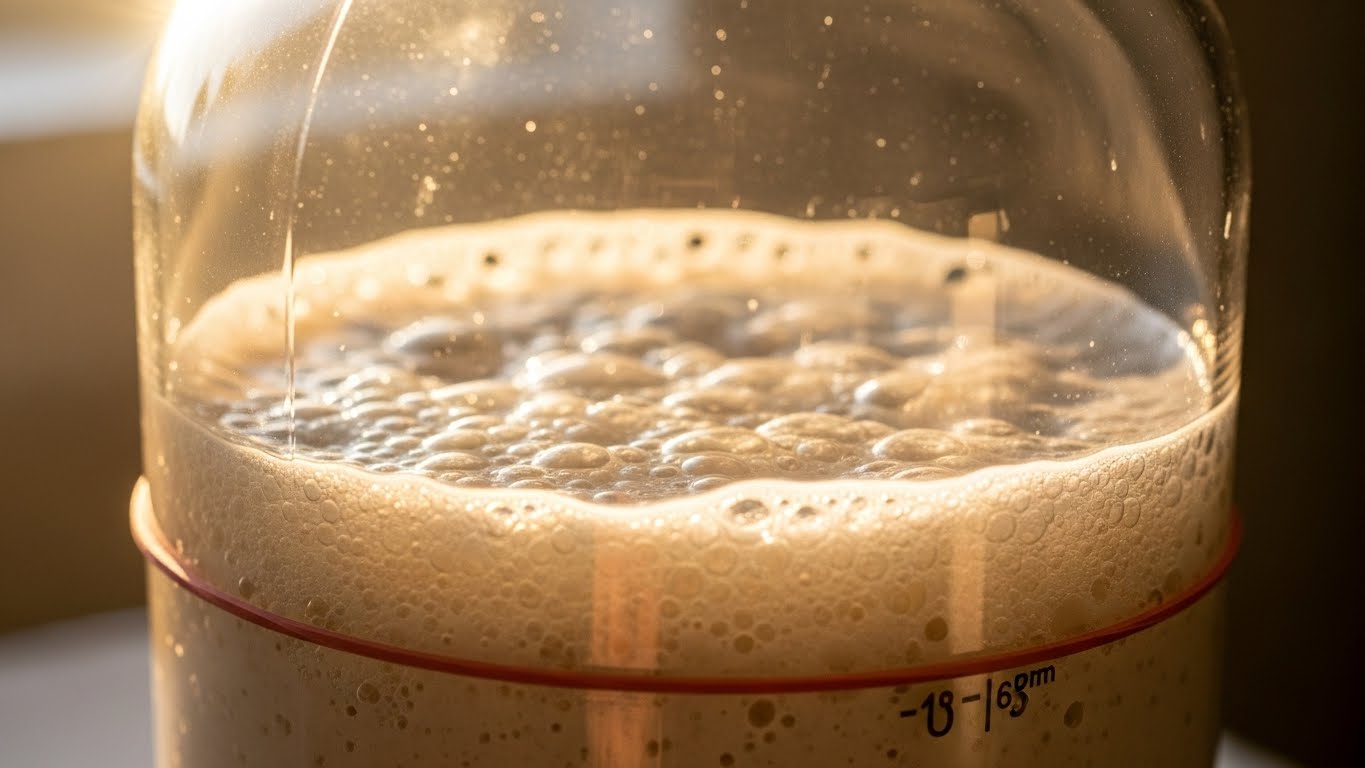
- Day 1-7: Mix equal parts (by weight) of brown rice flour and water. Discard half each day and feed again.
- Maintenance: Once it doubles in size within 4-6 hours of feeding and smells yeasty/tangy, it is ready to bake.
Tip: Ensure your starter is at its “peak” (highest point of rise) before mixing it into your dough. This ensures maximum lifting power.
Step-by-step GF sourdough method
This is the master method for a rustic, artisan-style gluten free sourdough bread.
Yields: 1 Loaf | Prep Time: 45 mins | Rise Time: 4-6 hours | Bake Time: 50-60 mins
Ingredients:
- 350g Water (lukewarm)
- 150g Active Gluten-Free Sourdough Starter (100% hydration)
- 25g Whole Psyllium Husk
- 10g Honey or Maple Syrup (helps browning)
- 130g Brown Rice Flour
- 100g Sorghum Flour
- 50g Tapioca Starch
- 50g Potato Starch
- 10g Fine Sea Salt
Step 1: Making the Psyllium Gel
In a large mixing bowl, combine the water, active starter, honey, and psyllium husk. Whisk immediately and thoroughly.
- Why? Psyllium clumps instantly. You need to hydrate it before adding flour. Let this sit for 10 minutes until it forms a thick gel.
Step 2: Mixing the Dry Ingredients
In a separate bowl, whisk together the brown rice flour, sorghum flour, tapioca starch, potato starch, and salt.
- Checking ingredients: Sometimes recipes call for extra lift. Unlike quick breads where you might wonder is baking powder gluten free, in traditional sourdough, we skip the chemical leaveners and rely entirely on the wild yeast.
Step 3: Mixing the Dough
Add the dry ingredients to the psyllium gel mixture. If you have a stand mixer, use the paddle attachment. If not, use sturdy hands or a Danish dough whisk.
- Texture Check: The dough will be sticky but should hold together. It will feel like wet clay or Play-Doh, not like traditional elastic wheat dough. Knead it for about 5 minutes to ensure full hydration.
Step 4: Bulk Fermentation
Shape the dough into a rough ball and leave it in the bowl. Cover with a damp towel. Let it ferment at room temperature for 3 to 5 hours.
- The Goal: You want the dough to feel airy and slightly puffy. It won’t double in size like wheat dough (maybe 30-50% growth).
Step 5: Shaping and Proofing
Turn the dough onto a lightly floured surface (use brown rice flour). Gently press it out and fold the edges into the center to create tension. Flip it over so the smooth side is up.
Rotate the dough using your hands to tighten the surface “skin.”
Place the dough upside down (seam side up) into a flour-dusted banneton. Cover and place in the fridge for a Cold Proof (8-12 hours).
- Why Cold Proof? This develops flavor and firms up the dough, making it easier to score and bake.

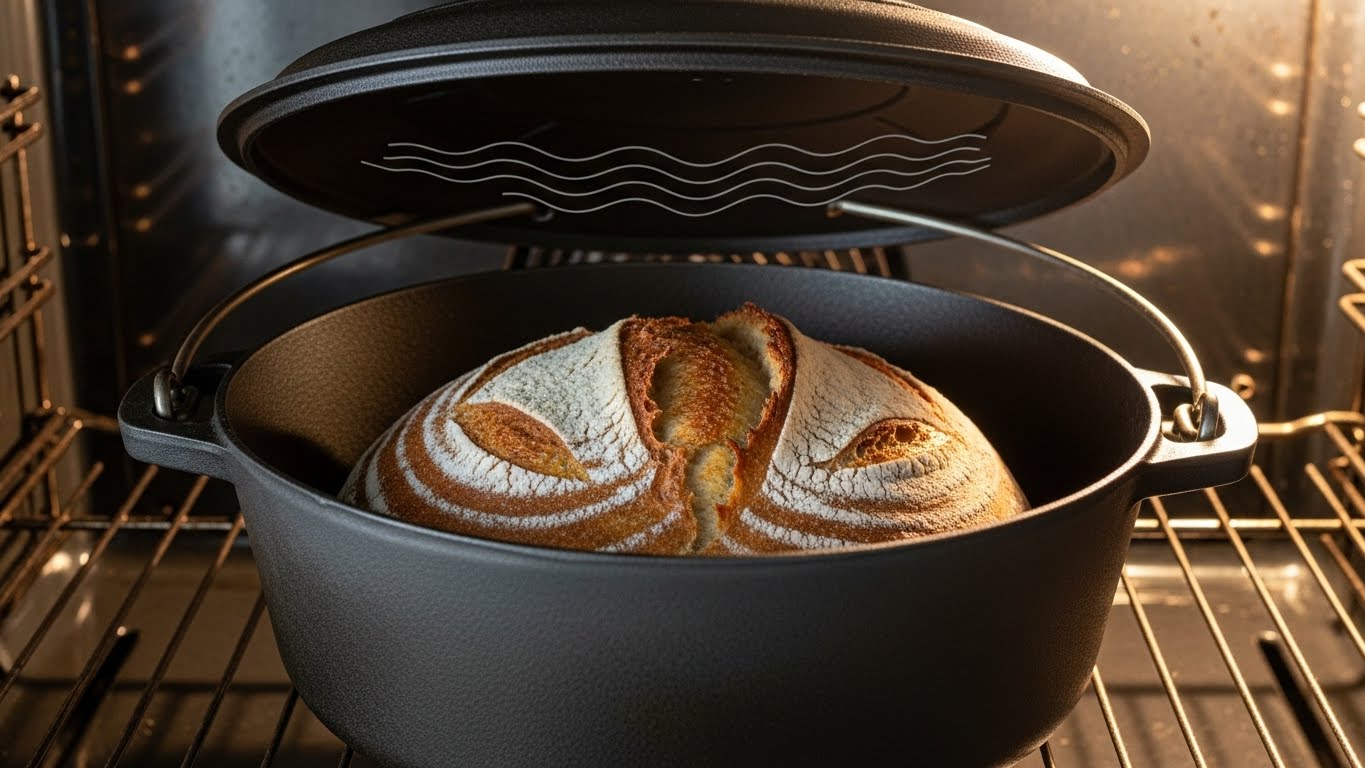
Step 6: The Bake
- Place your Dutch oven (lid on) into the oven and preheat to 450°F (230°C) for at least 45 minutes.
- Remove dough from the fridge. Flip it onto a piece of parchment paper.
- Scoring: Use a razor blade to cut a deep slash (about 1/2 inch deep) across the top. This allows steam to escape.
- Carefully lower the dough (on parchment) into the hot Dutch oven. Cover with the lid.
- Bake with lid ON: 40 minutes. (Steam creates the crust).
- Bake with lid OFF: Remove lid, lower heat to 425°F (220°C), and bake for another 20-30 minutes until the crust is deep chestnut brown.
Step 7: The Crucial Cooling Phase
Remove the bread and place it on a wire rack.
DO NOT CUT IT YET.
I repeat: Do not slice warm gluten free sourdough bread. It needs to cool completely (at least 4-6 hours) for the crumb to set. If you cut it warm, it will be gummy and sticky inside.
Troubleshooting Common Issues
Even experts struggle with gluten free sourdough bread. Here is how to fix common problems.
Problem 1: The Gummy Crumb
This is the most common complaint.
- Cause: Under-baked or cut too soon.
- Fix: Bake it longer than you think. The internal temperature should reach at least 210°F (99°C). And let it cool for 6 hours!
Problem 2: The Flying Crust (Gap between crust and bread)
- Cause: Over-proofing (left too long to rise) or the oven wasn’t hot enough.
- Fix: Reduce bulk fermentation time by 30 minutes. Ensure your Dutch oven is screaming hot before the dough goes in.
Problem 3: The Bread didn’t rise (Dense brick)
- Cause: Weak starter or dead yeast.
- Fix: Feed your starter twice a day for 3 days before baking to boost its activity. Ensure your water isn’t too hot (which kills yeast).
Comparison: Wheat Sourdough vs. GF Sourdough
| Feature | Wheat Sourdough | Gluten Free Sourdough |
| Primary Binder | Gluten (Protein) | Psyllium Husk (Fiber) |
| Hydration Feel | Elastic, stretchy | Clay-like, putty-like |
| Kneading | Essential for gluten development | Minimal (just to mix) |
| Rise Volume | Doubles or triples | Increases 30-50% |
| Cooling Time | 1-2 hours | 4-6 hours (Crucial) |
Flavor Variations to Try
Once you master the base recipe, you can start experimenting.
- Seeded Loaf: Add 50g of mixed seeds (sunflower, pumpkin, flax) during the mixing stage. Soak them in warm water for an hour beforehand so they don’t steal moisture from the dough.
- Rosemary & Olive: Add 2 tbsp of chopped fresh rosemary and 1/4 cup of chopped Kalamata olives.
- Cinnamon Raisin: Add 1 tsp cinnamon and 1/3 cup raisins (soak raisins first).
Storing and Serving Suggestions
Gluten free sourdough bread has a different shelf life than commercial bread.
- Countertop: Store cut side down on a cutting board or in a linen bag for up to 2 days. Do not use plastic bags (the crust will get soft and moldy).
- Freezing: This is the best method. Slice the entire loaf once cooled. Place parchment between slices and freeze in a zip-lock bag. Toast slices directly from frozen.
Serving Ideas:
- Avocado Toast: The sturdy texture of GF sourdough holds up perfectly to heavy toppings.
- Grilled Cheese: The crisp crust makes for an incredible sandwich.
- Soup Dipper: Perfect with tomato soup or clam chowder.
Frequently Asked Questions (FAQ)
- Can I make gluten free sourdough bread without a Dutch oven?
Yes, but it is harder to get a good crust. If you don’t have a Dutch oven, bake the loaf on a pizza stone or baking sheet. To create steam, place a metal pan on the bottom rack of the oven and pour boiling water into it right when you put the bread in. Steam helps the bread expand before the crust hardens.
- Why is my gluten free sourdough bread wet inside?
If you followed the recipe exactly, the issue is almost certainly cooling time. Gluten-free starches and psyllium take a very long time to release moisture and “set” their structure. Cutting into the loaf before it is completely cool interrupts this process, leaving the crumb wet and sticky.
- Is sourdough bread naturally gluten-free?
No. Traditional sourdough is made from wheat, rye, or spelt, all of which contain gluten. The fermentation process breaks down some gluten, making it easier to digest for some people, but it is unsafe for people with Celiac disease. You must use gluten-free flours and a dedicated gluten-free starter to make safe gluten free sourdough bread.
- Can I use Xanthan Gum instead of Psyllium Husk?
Technically yes, but the texture will be different. Xanthan gum tends to make a tighter, slightly gummi-er crumb that is better for cakes or cookies. For artisan bread, Psyllium Husk is superior because it provides the open, airy structure and rustic chewiness that mimics wheat bread.
Conclusion
Baking a beautiful loaf of gluten free sourdough bread is one of the most rewarding experiences you can have in the kitchen. It reclaims a simple pleasure that many thought was lost forever after a Celiac diagnosis.
Yes, it requires patience. Yes, you might bake a few “bricks” before you get the perfect loaf. But when you pull that golden, crusty, aromatic bread out of the oven and hear the crackle of the crust cooling, you will know it was worth every minute.
So, feed your starter, weigh out your flour, and get ready to bake the best bread of your life—no wheat required.
Ready to start your sourdough journey? Don’t forget to grab a fresh bag of Psyllium Husk, as that is the key to your success. Let us know in the comments how your first loaf turns out!